Ch8-4 预乘Alpha
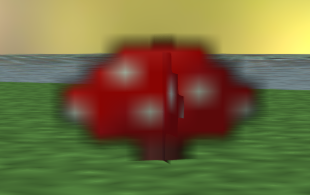
你是否曾看到过这样的图像,3D场景中,薄片状物体的边缘显得很不自然:
-
图片出处,能流畅阅读英文的话看链接里这篇文章即可理解预乘alpha的意义。
采样带透明度的图像时,若没有使用预乘alpha的图像,线型滤波的结果便会呈现出上面这般模样。
先前在Ch1-4 创建交换链中已经简单说明过了什么是预乘透明度,此概念即为预乘alpha。
这里再次简要说明下什么是预乘alpha:
-
直接alpha(straight alpha):RGB通道代表原始的红蓝绿色值,与A通道(A即代表alpha)相互独立。
-
预乘alpha(premultiplied alpha):RGB通道的数值为原始的红蓝绿色值与A通道值的乘积(这意味着当你需要修改A通道的数值时,RGB通道的数值应被一并放缩)。
考虑到Ch1-4是入门篇章,将“premultiplied alpha”译作“预乘透明度”比较易懂,网络上通常也是这么翻译的。
这个翻译并不能算准确,有两个原因:A通道值未必是用作不透明度。
混色与线性插值
要理解预乘alpha的作用,得先从混色讲起。
通常会将A通道的值用作不透明度:若一个片段的不透明度为a(a为一个比值),在混色时,应有a的颜色来自该片段本身,(1 - a)的颜色来自其背景。
如果你不采样带透明像素的贴图(或采样这类贴图但不发生放缩),仅仅是片段着色器可能输出半透明的颜色,且输出的色值采用直接alpha,那么正确处理透明度的混色方式如下:
VkPipelineColorBlendAttachmentState{
    .blendEnable = VK_TRUE,
    .srcColorBlendFactor = VK_BLEND_FACTOR_SRC_ALPHA,
    .dstColorBlendFactor = VK_BLEND_FACTOR_ONE_MINUS_SRC_ALPHA,
    .colorBlendOp = VK_BLEND_OP_ADD,
    .srcAlphaBlendFactor = VK_BLEND_FACTOR_ONE,
    .dstAlphaBlendFactor = VK_BLEND_FACTOR_ONE_MINUS_SRC_ALPHA,
    .alphaBlendOp = VK_BLEND_OP_ADD,
    .colorWriteMask = 0b1111
};
-
这些枚举项的解释见VkPipelineColorBlendStateCreateInfo。
将混色结果标记为result,则(加斜字体对应混色因子枚举项):
result.rgb = src.rgb * src.a + dst.rgb * (1 - src.a)
result.a = src.a * 1 + dst.a * (1 - src.a)
注意到dst.rgb没有乘dst.a,这是因为按这种方法混色的话,混色结果是预乘alpha的,而dst是已经在颜色附件中的色值,如果先前使用的是同样的混色方式,那么dst.rgb当然已经预乘了A通道值。
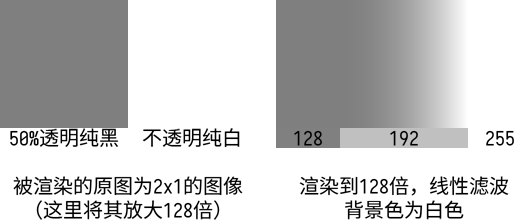
然而,这种混色方式在放缩带透明度的贴图(尤其是放大),且应用线性滤波时会造成不自然的颜色过渡:
-
上图中,线型滤波的结果图像,如果从128到255是线性地过渡的,中线上的灰度理应是191或192。
但比对底下用做参考的灰度为192的色块,显然192出现在了结果图像的中线右方,而中线上的数值是159。
这是为什么呢?试着计算中线上src的数值:vec4(0, 0, 0, 0.5) * 0.5 + vec4(1, 1, 1, 1) * 0.5,结果是{ 0.5, 0.5, 0.5, 0.75 }。
结果无所谓啦,关键在于将RGBA各通道线性插值后,再将RGB通道乘以A通道,这是在将两个线性变化的量相乘。
线性变化即按一次函数变化,两个一次函数的乘积是二次函数,并非线性函数。因而上图渲染结果的渐变部分,靠近128的一侧的变化较为平缓,而靠近255一侧则较为剧烈。
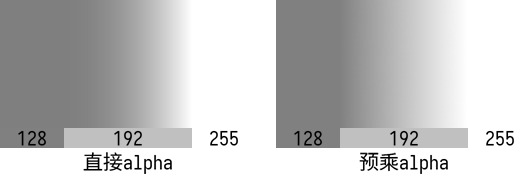
解决办法就是在采样贴图前,将贴图的RGB通道变为预乘alpha,即将“RGB通道乘以A通道”这一步放到线性插值前。
则混色方式得相应地变为:
VkPipelineColorBlendAttachmentState{
    .blendEnable = VK_TRUE,
    .srcColorBlendFactor = VK_BLEND_FACTOR_ONE, //改动
    .dstColorBlendFactor = VK_BLEND_FACTOR_ONE_MINUS_SRC_ALPHA,
    .colorBlendOp = VK_BLEND_OP_ADD,
    .srcAlphaBlendFactor = VK_BLEND_FACTOR_ONE,
    .dstAlphaBlendFactor = VK_BLEND_FACTOR_ONE_MINUS_SRC_ALPHA,
    .alphaBlendOp = VK_BLEND_OP_ADD,
    .colorWriteMask = 0b1111
};
比较直接alpha与预乘alpha图像的渲染结果:
-
使用预乘alpha的RGB通道值后,虽然线型滤波的结果在数值上确实是线性变化的,但显示出的渐变效果在视觉上可能仍显得不够柔和,将色值映射到sRGB色彩空间可以获得更好的效果,见Ch8-5 sRGB色彩空间与开启HDR。
对于颜色的线性插值,除去应使用预乘alpha的贴图外,还有以下注意事项:
-
若有色值被插值后输入到片段着色器,则片段着色器前的着色器阶段应当输出预乘alpha的色值。
-
注意色彩空间:插值之前,应确保色值是线性色彩空间中的色值(相关概念会在下一节中进行讲解)。
创建预乘alpha的贴图
虽然渲染中有使用预乘alpha贴图的必要性,但通常你接触到的图像文件会是直接alpha的。
你从网上下到的PNG通常都会是直接alpha的,PNG标准中规定其图像数值应是直接alpha的形式:
The colour values in a pixel are not premultiplied by the alpha value assigned to the pixel.
虽然图像查看器/图像处理软件在渲染图像时可能会做预乘alpha的处理,但图像处理软件保存的图片通常会是直接alpha的。
这是因为预乘alpha的图像不适合被用于编辑:考虑到图像的存储精度,让RGB通道乘以A通道值,会造成不可逆的精度损失。
例如:每通道8位的图像,直接alpha的R值为1/255,A值只要在[0, 127/255]之间,预乘后的R值便会舍入为0,将0除以A值无法还原到1/255。
综上,既是如此,有必要实现从直接alpha贴图创建预乘alpha贴图的功能。
值得注意的一点是,即便一张图中只有完全透明的像素(A通道值为0)及完全不透明的像素(A通道值为1),可能也需要让RGB通道预乘A通道值。
如果这些完全透明像素的RGB通道都是0,那么显然是否预乘没有任何差别。
然而,用stb_image读取PNG这类压缩格式得到的图像数据,完全透明像素的RGB通道可能不为0,应当将它们预乘为0。
(解决这个问题的方法之一当然是换一个图像读取库,不过我没有费事去尝试别的库,没什么可推荐的)
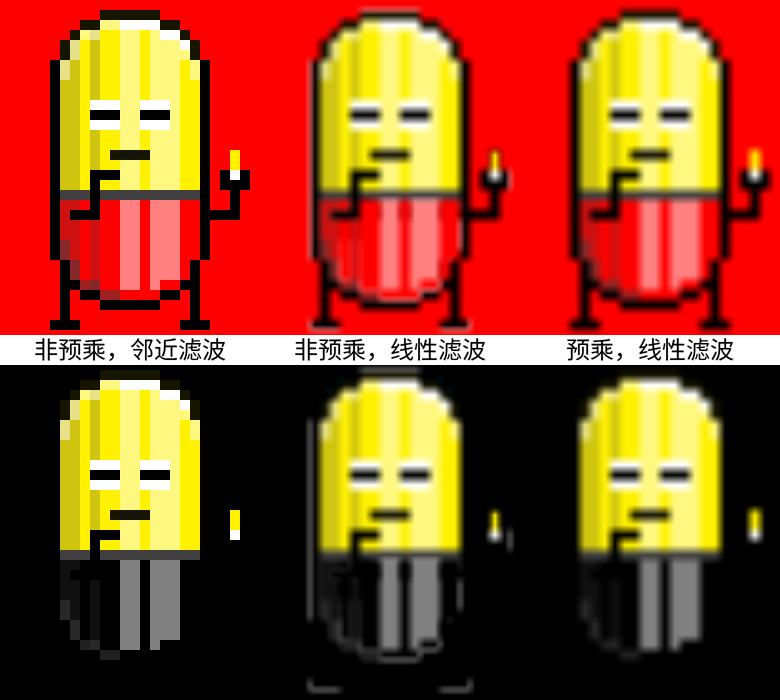
下图中以三种不同的方式渲染了一个...呃,手上拿着一颗胶囊的胶囊小人(画得很烂,请不要在意),它的头是黄色,透明的下半身透出底色,在此基础上加了半透明的高光和阴影:
-
原图被渲染到20倍大小,可以看到,非预乘透明度的情况下,在不透明/半透明与全透明的边界上,呈现出了诡异的灰边——有些地方在高亮度背景上显暗,有些地方低亮度背景上发白,这正是全透明像素的RGB通道非0导致的结果。
概念和注意事项到此为止便讲完了,后续是解说具体的代码。
如果你觉得自己至今为止学得还不错,可以基于所学自行实现相应功能,然后再来对答案。
怎么实现?
没必要每次都在运行期创建预乘alpha的贴图,可以预渲染完然后存盘。如果你只是单纯地想实现这一目的的话,最省事的方法当然是直接用C++代码在CPU侧处理stb_image读到的数据,因为不必考虑运行期的效率,都不需要用上Vulkan。
不过这样的话这一节的内容也就没必要往下写了。
考虑用Vulkan做这件事情,需要采样贴图吗?
既然我特地将(大部分教程中会早早地就讲到的)混色拖到这一节才讲,自然是有些原因啦:
将已经存有直接alpha色值的图像用作颜色附件,然后利用混色,将dst.rgb * dst.a的数值写入该附件即可。
“创建预乘alpha的贴图”是一套较为固定的流程,可以用一个类封装与之相关的对象和函数。
向EasyVulkan.hpp,easyVulkan命名空间中,加入以下内容:
using callback_copyData_t = void(*)(const void* pData, VkDeviceSize dataSize);
class fCreateTexture2d_multiplyAlpha {
protected:
    VkFormat format_final = VK_FORMAT_UNDEFINED;
    bool generateMipmap = false;
    callback_copyData_t callback_copyData = nullptr;
    renderPass renderPass;
    pipelineLayout pipelineLayout;
    pipeline pipeline;
    //该函数会被operator()(...)调用
    void CmdTransferDataToImage(VkCommandBuffer commandBuffer, const uint8_t* pImageData, VkExtent2D extent, VkFormat format_initial, imageMemory& imageMemory_conversion, VkImage image) const {
        /*待填充*/
    }
    //Static
    static constexpr const char* filepath_vert = "shader/RenderToImage2d_NoUV.vert.spv";
    static constexpr const char* filepath_frag = "shader/RenderNothing.frag.spv";
    //Static Function
    static const VkPipelineShaderStageCreateInfo Ssci_Vert() {
        /*待填充*/
    }
    static const VkPipelineShaderStageCreateInfo Ssci_Vert() {
        /*待填充*/
    }
    static const VkPipelineLayout PipelineLayout() {
        /*待填充*/
    }
public:
    fCreateTexture2d_multiplyAlpha() = default;
    fCreateTexture2d_multiplyAlpha(VkFormat format_final, bool generateMipmap, callback_copyData_t callback_copyMipLevel0) {
        Instantiate(format_final, generateMipmap, callback_copyMipLevel0);
    }
    fCreateTexture2d_multiplyAlpha(fCreateTexture2d_multiplyAlpha&&) = default;
    //Const Function
    texture2d operator()(const char* filepath, VkFormat format_initial) const {
        VkExtent2D extent;
        formatInfo formatInfo = FormatInfo(format_initial);
        std::unique_ptr<uint8_t[]> pImageData = texture::LoadFile(filepath, extent, formatInfo);
        if (pImageData)
            return (*this)(pImageData.get(), extent, format_initial);
        return texture2d{};
    }
    texture2d operator()(const uint8_t* pImageData, VkExtent2D extent, VkFormat format_initial) const {
        /*待填充*/
    }
    //Non-const Function
    void Instantiate(VkFormat format_final, bool generateMipmap, callback_copyData_t callback_copyMipLevel0) {
        this->format_final = format_final;
        this->generateMipmap = generateMipmap;
        callback_copyData = callback_copyData_t;
        /*待后续填充*/
    }
}
顾名思义,fCreateTexture2d_multiplyAlpha这个类用来创建预乘alpha的2D贴图,fCreateTexture2d_multiplyAlpha::operator()说明该类的实例可以像函数一样被使用(这种类叫做“仿函数”)。
这个类不处理2D贴图数组,要处理2D贴图数组得把事情复杂化:要么为每个图层创建帧缓冲,要么使用多层帧缓冲和几何着色器,要么用动态渲染省去帧缓冲。
传入Instantiate(...)的参数callback_copyMipLevel0被保存到成员变量callback_copyData,它是一个回调函数的指针,方便你获取预乘后的图像数据。
其余各个成员函数的参数名,你应该在Ch5-2 2D贴图及生成Mipmap中都见过,就不多做解释了。
创建渲染通道
在Instantiate(...)中创建渲染通道和管线。
所要创建的的渲染通道只需要一个子通道和一个颜色附件,这没有什么疑义。
向Instantiate(...)提供的参数中,有指示是否生成mipmap的generateMipmap、用于获取图像数据的回调函数指针callback_copyMipLevel0,这两个参数对渲染通道结束后干什么造成影响,相应地也就会影响附件描述中的finalLayout和子通道依赖。
通过混色来预乘alpha这件事结束后,如果到采样贴图为止不需要拿该图像干别的什么事,附件描述中的finalLayout当然是VK_IMAGE_LAYOUT_SHADER_READ_ONLY_OPTIMAL。
要在CPU一侧获取图像数据,得把数据拷贝到暂存缓冲区,而生成mipmap也得用blit命令,则附件描述中的finalLayout该是VK_IMAGE_LAYOUT_TRANSFER_SRC_OPTIMAL。
VkAttachmentDescription attachmentDescription = {
    .format = format_final,
    .samples = VK_SAMPLE_COUNT_1_BIT,
    .loadOp = VK_ATTACHMENT_LOAD_OP_LOAD,
    .storeOp = VK_ATTACHMENT_STORE_OP_STORE,
    .initialLayout = VK_IMAGE_LAYOUT_COLOR_ATTACHMENT_OPTIMAL,
    .finalLayout = generateMipmap || callback_copyData ? VK_IMAGE_LAYOUT_TRANSFER_SRC_OPTIMAL : VK_IMAGE_LAYOUT_SHADER_READ_ONLY_OPTIMAL
};
-
与之前写2D贴图的封装时一样,之后会调用imageOperation::CmdCopyBufferToImage(...)和imageOperation::CmdBlitImage(...)来搬运图像数据,我打算让这俩函数里的图像内存屏障把内存布局给顺带转到VK_IMAGE_LAYOUT_COLOR_ATTACHMENT_OPTIMAL。
渲染通道开始前的同步由前述图像内存屏障确保。
渲染通道结束后没啥事的话不需要在命令缓冲区里做同步。若要在同一命令缓冲区中copy或blit预乘后的图像数据,则需要以下子通道依赖:
VkSubpassDependency subpassDependency = {
    .srcSubpass = 0,
    .dstSubpass = VK_SUBPASS_EXTERNAL,
    .srcStageMask = VK_PIPELINE_STAGE_COLOR_ATTACHMENT_OUTPUT_BIT,
    .dstStageMask = VK_PIPELINE_STAGE_TRANSFER_BIT,
    .srcAccessMask = VK_ACCESS_COLOR_ATTACHMENT_WRITE_BIT,
    .dstAccessMask = VK_ACCESS_TRANSFER_READ_BIT
};
毫无难度地填写掉渲染通道创建信息中的其他内容,并对代码逻辑略作整理,目前Instantiate(...)长这样:
void Instantiate(VkFormat format_final, bool generateMipmap, callback_copyData_t callback_copyMipLevel0) {
    this->format_final = format_final;
    this->generateMipmap = generateMipmap;
    callback_copyData = callback_copyData_t;

    //Create renderpass
    VkAttachmentDescription attachmentDescription = {
        .format = format_final,
        .samples = VK_SAMPLE_COUNT_1_BIT,
        .loadOp = VK_ATTACHMENT_LOAD_OP_LOAD,
        .storeOp = VK_ATTACHMENT_STORE_OP_STORE,
        .initialLayout = VK_IMAGE_LAYOUT_COLOR_ATTACHMENT_OPTIMAL,
        .finalLayout = VK_IMAGE_LAYOUT_SHADER_READ_ONLY_OPTIMAL
    };
    VkAttachmentReference attachmentReference = { 0, VK_IMAGE_LAYOUT_COLOR_ATTACHMENT_OPTIMAL };
    VkSubpassDescription subpassDescription = {
        .pipelineBindPoint = VK_PIPELINE_BIND_POINT_GRAPHICS,
        .colorAttachmentCount = 1,
        .pColorAttachments = &attachmentReference
    };
    VkSubpassDependency subpassDependency = {
        .srcSubpass = 0,
        .dstSubpass = VK_SUBPASS_EXTERNAL,
        .srcStageMask = VK_PIPELINE_STAGE_COLOR_ATTACHMENT_OUTPUT_BIT,
        .dstStageMask = VK_PIPELINE_STAGE_TRANSFER_BIT,
        .srcAccessMask = VK_ACCESS_COLOR_ATTACHMENT_WRITE_BIT,
        .dstAccessMask = VK_ACCESS_TRANSFER_READ_BIT
    };
    VkRenderPassCreateInfo renderPassCreateInfo = {
        .attachmentCount = 1,
        .pAttachments = &attachmentDescription,
        .subpassCount = 1,
        .pSubpasses = &subpassDescription
    };
    if (generateMipmap || callback_copyData)
        attachmentDescription.finalLayout = VK_IMAGE_LAYOUT_TRANSFER_SRC_OPTIMAL,
        renderPassCreateInfo.dependencyCount = 1,
        renderPassCreateInfo.pDependencies = &subpassDependency;
    renderPass.Create(renderPassCreateInfo);

    /*待后续填充*/
}
书写着色器并创建管线
RenderToImage2d_NoUV.vert.shader
因为不会采样贴图,只要将整个NDC坐标范围输出到gl_Position即可,不需要输出贴图坐标:
#version 460
#pragma shader_stage(vertex)

vec2 positions[4] = {
    {-1,-1},
    {-1, 1},
    { 1,-1},
    { 1, 1}
};

void main() {
    gl_Position = vec4(positions[gl_VertexIndex], 0, 1);
}
RenderNothing.frag.shader
#version 460
#pragma shader_stage(fragment)

layout(location = 0) out vec4 o_Color;

void main() {
    o_Color = vec4(0);
}
-
输出什么数值都无所谓(反正之后混色的时候也用不着),这里就输出四个通道皆为0的数值了(所以着色器名称叫RenderNothing)。
但是得有输出,否则驱动很可能不会执行包括混色在内的后续图形管线功能。
创建管线
首先填充用来读取着色器的函数Ssci_Vert()和Ssci_Frag():
static const VkPipelineShaderStageCreateInfo Ssci_Vert() {
    static shaderModule shader;
    if (!shader) {
        shader.Create(filepath_vert);
        ExecuteOnce(shader.StageCreateInfo(VK_SHADER_STAGE_VERTEX_BIT)); //防止再次执行此if语句块时,重复添加回调函数
        graphicsBase::Base().AddCallback_DestroyDevice([] { shader.~shaderModule(); });
    }
    return shader.StageCreateInfo(VK_SHADER_STAGE_VERTEX_BIT);
}
static const VkPipelineShaderStageCreateInfo Ssci_Frag() {
    static shaderModule shader;
    if (!shader) {
        shader.Create(filepath_frag);
        ExecuteOnce(shader.StageCreateInfo(VK_SHADER_STAGE_FRAGMENT_BIT)); //防止再次执行此if语句块时,重复添加回调函数
        graphicsBase::Base().AddCallback_DestroyDevice([] { shader.~shaderModule(); });
    }
    return shader.StageCreateInfo(VK_SHADER_STAGE_FRAGMENT_BIT);
}
-
这里考虑了需要重建逻辑设备的情况:如果不会重建逻辑设备,则
if (!shader)之后的语句块只会执行一次,否则会在销毁旧逻辑设备时调用这里定义的回调函数,将shader覆写为VK_NULL_HANDLE,然后再次执行shader.Create(filepath_frag)。
创建管线布局,因为不需要push constant和任何描述符,也不依赖于任何其他参数,在静态成员函数PipelineLayout()中创建一个没任何东西的管线布局:
static const VkPipelineLayout PipelineLayout() {
    static pipelineLayout pipelineLayout;
    if (!pipelineLayout) {
        VkPipelineLayoutCreateInfo pipelineLayoutCreateInfo = {};
        pipelineLayout.Create(pipelineLayoutCreateInfo);
        ExecuteOnce(pipelineLayout);
        graphicsBase::Base().AddCallback_DestroyDevice([] { pipelineLayout.~pipelineLayout(); });
    }
    return pipelineLayout;
}
继续填充Instantiate(...):
void Instantiate(VkFormat format_final, bool generateMipmap, callback_copyData_t callback_copyMipLevel0) {
    /*...前面略*/

    //Create pipeline
    graphicsPipelineCreateInfoPack pipelineCiPack;
    pipelineCiPack.createInfo.layout = PipelineLayout();
    pipelineCiPack.createInfo.renderPass = renderPass;
    pipelineCiPack.shaderStages.push_back(Ssci_Vert());
    pipelineCiPack.shaderStages.push_back(Ssci_Frag());
    pipelineCiPack.inputAssemblyStateCi.topology = VK_PRIMITIVE_TOPOLOGY_TRIANGLE_STRIP;
    pipelineCiPack.multisampleStateCi.rasterizationSamples = VK_SAMPLE_COUNT_1_BIT;
    /*待后续填充*/
}
Instantiate(...)的参数中没有图像大小,这个管线将会适用于任意大小的图像附件。
为满足这一要求,使用动态的视口大小:
pipelineCiPack.dynamicStates.push_back(VK_DYNAMIC_STATE_VIEWPORT);
不需要剪裁,则剪裁范围得涵盖整个视口,既然要比视口大,视口大小又不确定,那自然是填写帧缓冲所能达到的最大长宽:
pipelineCiPack.scissors.emplace_back(VkOffset2D{}, VkExtent2D{
    graphicsBase::Base().PhysicalDeviceProperties().limits.maxFramebufferWidth,
    graphicsBase::Base().PhysicalDeviceProperties().limits.maxFramebufferHeight });
混色方式当然是这样啦:
pipelineCiPack.colorBlendAttachmentStates.emplace_back(
    .blendEnable = VK_TRUE,
    .srcColorBlendFactor = VK_BLEND_FACTOR_ZERO,
    .dstColorBlendFactor = VK_BLEND_FACTOR_DST_ALPHA, //RGB乘以A
    .colorBlendOp = VK_BLEND_OP_ADD,
    .srcAlphaBlendFactor = VK_BLEND_FACTOR_ZERO,
    .dstAlphaBlendFactor = VK_BLEND_FACTOR_ONE,       //A不变
    .alphaBlendOp = VK_BLEND_OP_ADD,
    .colorWriteMask = 0b1111
);
于是整个Instantiate(...)如下:
void Instantiate(VkFormat format_final, bool generateMipmap, callback_copyData_t callback_copyMipLevel0) {
    this->format_final = format_final;
    this->generateMipmap = generateMipmap;
    callback_copyData = callback_copyData_t;

    //Create renderpass
    VkAttachmentDescription attachmentDescription = {
        .format = format_final,
        .samples = VK_SAMPLE_COUNT_1_BIT,
        .loadOp = VK_ATTACHMENT_LOAD_OP_LOAD,
        .storeOp = VK_ATTACHMENT_STORE_OP_STORE,
        .initialLayout = VK_IMAGE_LAYOUT_COLOR_ATTACHMENT_OPTIMAL,
        .finalLayout = VK_IMAGE_LAYOUT_SHADER_READ_ONLY_OPTIMAL
    };
    VkAttachmentReference attachmentReference = { 0, VK_IMAGE_LAYOUT_COLOR_ATTACHMENT_OPTIMAL };
    VkSubpassDescription subpassDescription = {
        .pipelineBindPoint = VK_PIPELINE_BIND_POINT_GRAPHICS,
        .colorAttachmentCount = 1,
        .pColorAttachments = &attachmentReference
    };
    VkSubpassDependency subpassDependency = {
        .srcSubpass = 0,
        .dstSubpass = VK_SUBPASS_EXTERNAL,
        .srcStageMask = VK_PIPELINE_STAGE_COLOR_ATTACHMENT_OUTPUT_BIT,
        .dstStageMask = VK_PIPELINE_STAGE_TRANSFER_BIT,
        .srcAccessMask = VK_ACCESS_COLOR_ATTACHMENT_WRITE_BIT,
        .dstAccessMask = VK_ACCESS_TRANSFER_READ_BIT
    };
    VkRenderPassCreateInfo renderPassCreateInfo = {
        .attachmentCount = 1,
        .pAttachments = &attachmentDescription,
        .subpassCount = 1,
        .pSubpasses = &subpassDescription
    };
    if (generateMipmap || callback_copyData)
        attachmentDescription.finalLayout = VK_IMAGE_LAYOUT_TRANSFER_SRC_OPTIMAL,
        renderPassCreateInfo.dependencyCount = 1,
        renderPassCreateInfo.pDependencies = &subpassDependency;
    renderPass.Create(renderPassCreateInfo);

    //Create pipeline
    graphicsPipelineCreateInfoPack pipelineCiPack;
    pipelineCiPack.createInfo.layout = PipelineLayout();
    pipelineCiPack.createInfo.renderPass = renderPass;
    pipelineCiPack.shaderStages.push_back(Ssci_Vert());
    pipelineCiPack.shaderStages.push_back(Ssci_Frag());
    pipelineCiPack.inputAssemblyStateCi.topology = VK_PRIMITIVE_TOPOLOGY_TRIANGLE_STRIP;
    pipelineCiPack.scissors.emplace_back(VkOffset2D{}, VkExtent2D{
        graphicsBase::Base().PhysicalDeviceProperties().limits.maxFramebufferWidth,
        graphicsBase::Base().PhysicalDeviceProperties().limits.maxFramebufferHeight });
    pipelineCiPack.multisampleStateCi.rasterizationSamples = VK_SAMPLE_COUNT_1_BIT;
    pipelineCiPack.colorBlendAttachmentStates.emplace_back(
        VK_TRUE,
        VK_BLEND_FACTOR_ZERO, VK_BLEND_FACTOR_DST_ALPHA, VK_BLEND_OP_ADD,
        VK_BLEND_FACTOR_ZERO, VK_BLEND_FACTOR_ONE, VK_BLEND_OP_ADD,
        0b1111
    );
    pipelineCiPack.dynamicStates.push_back(VK_DYNAMIC_STATE_VIEWPORT);
    pipelineCiPack.UpdateAllArrays();
    pipeline.Create(pipelineCiPack);
}
CmdTransferDataToImage
这个函数用来将数据搬到VkImage对象,跟之前texture2d::Create_Internal(...)的逻辑类似,但不生成mipmap:
void CmdTransferDataToImage(VkCommandBuffer commandBuffer, const uint8_t* pImageData, VkExtent2D extent, VkFormat format_initial, imageMemory& imageMemory_conversion, VkImage image) const {
    VkDeviceSize imageDataSize = VkDeviceSize(FormatInfo(format_initial).sizePerPixel) * extent.width * extent.height;
    stagingBuffer::BufferData_MainThread(pImageData, imageDataSize);
    if (format_initial == format_final) {
        //若不需要格式转换,直接从暂存缓冲区拷贝到图像,不发生blit
        VkBufferImageCopy region = {
            .imageSubresource = { VK_IMAGE_ASPECT_COLOR_BIT, 0, 0, 1 },
            .imageExtent = { extent.width, extent.height, 1 }
        };
        imageOperation::CmdCopyBufferToImage(commandBuffer, stagingBuffer::Buffer_MainThread(), image, region,
            { VK_PIPELINE_STAGE_TOP_OF_PIPE_BIT, 0, VK_IMAGE_LAYOUT_UNDEFINED },
            { VK_PIPELINE_STAGE_COLOR_ATTACHMENT_OUTPUT_BIT, VK_ACCESS_COLOR_ATTACHMENT_READ_BIT, VK_IMAGE_LAYOUT_COLOR_ATTACHMENT_OPTIMAL });
    }
    else
        if (VkImage image_preinitialized = stagingBuffer::AliasedImage2d_MainThread(format_initial, extent) {
            //若需要格式转换,但是能为暂存缓冲区创建混叠图像,则直接blit
            VkImageMemoryBarrier imageMemoryBarrier = {
                VK_STRUCTURE_TYPE_IMAGE_MEMORY_BARRIER,
                nullptr,
                0,
                VK_ACCESS_TRANSFER_READ_BIT,
                VK_IMAGE_LAYOUT_PREINITIALIZED,
                VK_IMAGE_LAYOUT_TRANSFER_SRC_OPTIMAL,
                VK_QUEUE_FAMILY_IGNORED,
                VK_QUEUE_FAMILY_IGNORED,
                image_preinitialized,
                { VK_IMAGE_ASPECT_COLOR_BIT, 0, 1, 0, 1 }
            };
            vkCmdPipelineBarrier(commandBuffer, VK_PIPELINE_STAGE_TOP_OF_PIPE_BIT, VK_PIPELINE_STAGE_TRANSFER_BIT, 0,
                0, nullptr, 0, nullptr, 1, &imageMemoryBarrier);

            VkImageBlit region = {
                { VK_IMAGE_ASPECT_COLOR_BIT, 0, 0, 1 },
                { {}, { int32_t(extent.width), int32_t(extent.height), 1 } },
                { VK_IMAGE_ASPECT_COLOR_BIT, 0, 0, 1 },
                { {}, { int32_t(extent.width), int32_t(extent.height), 1 } }
            };
            imageOperation::CmdBlitImage(commandBuffer, image_preinitialized, image, region,
                { VK_PIPELINE_STAGE_TOP_OF_PIPE_BIT, 0, VK_IMAGE_LAYOUT_UNDEFINED },
                { VK_PIPELINE_STAGE_COLOR_ATTACHMENT_OUTPUT_BIT, VK_ACCESS_COLOR_ATTACHMENT_READ_BIT, VK_IMAGE_LAYOUT_COLOR_ATTACHMENT_OPTIMAL });
        }
        else {
            //否则,创建新的暂存图像用于中转
            VkImageCreateInfo imageCreateInfo = {
                .imageType = VK_IMAGE_TYPE_2D,
                .format = format_initial,
                .extent = { extent.width, extent.height, 1 },
                .mipLevels = 1,
                .arrayLayers = 1,
                .samples = VK_SAMPLE_COUNT_1_BIT,
                .usage = VK_IMAGE_USAGE_TRANSFER_SRC_BIT | VK_IMAGE_USAGE_TRANSFER_DST_BIT
            };
            imageMemory_conversion.Create(imageCreateInfo, VK_MEMORY_PROPERTY_DEVICE_LOCAL_BIT);

            VkBufferImageCopy region_copy = {
                .imageSubresource = { VK_IMAGE_ASPECT_COLOR_BIT, 0, 0, 1 },
                .imageExtent = { extent.width, extent.height, 1 }
            };
            imageOperation::CmdCopyBufferToImage(commandBuffer, stagingBuffer::Buffer_MainThread(), imageMemory_conversion.Image(), region_copy,
                { VK_PIPELINE_STAGE_TOP_OF_PIPE_BIT, 0, VK_IMAGE_LAYOUT_UNDEFINED },
                { VK_PIPELINE_STAGE_TRANSFER_BIT, VK_ACCESS_TRANSFER_READ_BIT, VK_IMAGE_LAYOUT_TRANSFER_SRC_OPTIMAL });

            VkImageBlit region_blit = {
                { VK_IMAGE_ASPECT_COLOR_BIT, 0, 0, 1 },
                { {}, { int32_t(extent.width), int32_t(extent.height), 1 } },
                { VK_IMAGE_ASPECT_COLOR_BIT, 0, 0, 1 },
                { {}, { int32_t(extent.width), int32_t(extent.height), 1 } }
            };
            imageOperation::CmdBlitImage(commandBuffer, imageMemory_conversion.Image(), image, region_blit,
                { VK_PIPELINE_STAGE_TOP_OF_PIPE_BIT, 0, VK_IMAGE_LAYOUT_UNDEFINED },
                { VK_PIPELINE_STAGE_COLOR_ATTACHMENT_OUTPUT_BIT, VK_ACCESS_COLOR_ATTACHMENT_READ_BIT, VK_IMAGE_LAYOUT_COLOR_ATTACHMENT_OPTIMAL });
        }
}
-
本函数不负责执行录制的命令,在提交并执行完命令前须确保用于转换格式的暂存图像的生存期,因此imageMemory_conversion由函数外部传入。
你都读到这一节了,上述代码的逻辑应该完全不必解释。
不过这里的代码看着有些重复,其实要干的事也就视情况进行copy、blit、使用内存屏障,将代码简化如下:
void CmdTransferDataToImage(VkCommandBuffer commandBuffer, const uint8_t* pImageData, VkExtent2D extent, VkFormat format_initial, imageMemory& imageMemory_conversion, VkImage image) const {
    static constexpr imageOperation::imageMemoryBarrierParameterPack imbs[2] = {
        { VK_PIPELINE_STAGE_COLOR_ATTACHMENT_OUTPUT_BIT, VK_ACCESS_COLOR_ATTACHMENT_READ_BIT, VK_IMAGE_LAYOUT_COLOR_ATTACHMENT_OPTIMAL },
        { VK_PIPELINE_STAGE_TRANSFER_BIT, VK_ACCESS_TRANSFER_READ_BIT, VK_IMAGE_LAYOUT_TRANSFER_SRC_OPTIMAL }
    }
    VkDeviceSize imageDataSize = VkDeviceSize(FormatInfo(format_initial).sizePerPixel) * extent.width * extent.height;
    stagingBuffer::BufferData_MainThread(pImageData, imageDataSize);

    VkImage image_copyTo = VK_NULL_HANDLE;
    VkImage image_conversion = VK_NULL_HANDLE;
    VkImage image_blitTo = VK_NULL_HANDLE;
    if (format_initial == format_final)
        //若不需要格式转换,只发生拷贝,覆写image_copyTo
        image_copyTo = image;
    else {
        //若需要格式转换,但是能为暂存缓冲区创建混叠图像,覆写image_conversion为该混叠图像,image_copyTo保留为VK_NULL_HANDLE
        if (!(image_conversion = stagingBuffer::AliasedImage2d_MainThread(format_initial, extent)) {
            //否则,创建新的暂存图像用于中转
            VkImageCreateInfo imageCreateInfo = {
                .imageType = VK_IMAGE_TYPE_2D,
                .format = format_initial,
                .extent = { extent.width, extent.height, 1 },
                .mipLevels = 1,
                .arrayLayers = 1,
                .samples = VK_SAMPLE_COUNT_1_BIT,
                .usage = VK_IMAGE_USAGE_TRANSFER_SRC_BIT | VK_IMAGE_USAGE_TRANSFER_DST_BIT
            };
            imageMemory_conversion.Create(imageCreateInfo, VK_MEMORY_PROPERTY_DEVICE_LOCAL_BIT);
            //需要先将数据拷贝到上述暂存图像,再将其用作blit来源,覆写image_copyTo和image_conversion为该暂存图像的handle
            image_copyTo = image_conversion = imageMemory_conversion.Image();
        }
        //若需要格式转换,必发生blit,覆写image_blitTo
        image_blitTo = image;
    }

    if (image_copyTo) { //根据image_copyTo是否为VK_NULL_HANDLE,判定是否需要拷贝
        VkBufferImageCopy region = {
            .imageSubresource = { VK_IMAGE_ASPECT_COLOR_BIT, 0, 0, 1 },
            .imageExtent = { extent.width, extent.height, 1 }
        };
        imageOperation::CmdCopyBufferToImage(commandBuffer, stagingBuffer::Buffer_MainThread(), image_copyTo, region,
            { VK_PIPELINE_STAGE_TOP_OF_PIPE_BIT, 0, VK_IMAGE_LAYOUT_UNDEFINED }, imbs[bool(image_blitTo)]); //内存屏障参数由之后是否blit确定
    }

    if (image_blitTo) { //根据image_blitTo是否为VK_NULL_HANDLE,判定是否需要blit
        if (!image_copyTo) { //如果此时image_copyTo为VK_NULL_HANDLE,说明先前没发生拷贝,image_conversion是暂存缓冲区的混叠图像,需转换其内存布局
            VkImageMemoryBarrier imageMemoryBarrier = {
                VK_STRUCTURE_TYPE_IMAGE_MEMORY_BARRIER,
                nullptr,
                0,
                VK_ACCESS_TRANSFER_READ_BIT,
                VK_IMAGE_LAYOUT_PREINITIALIZED,
                VK_IMAGE_LAYOUT_TRANSFER_SRC_OPTIMAL,
                VK_QUEUE_FAMILY_IGNORED,
                VK_QUEUE_FAMILY_IGNORED,
                image_conversion,
                { VK_IMAGE_ASPECT_COLOR_BIT, 0, 1, 0, 1 }
            };
            vkCmdPipelineBarrier(commandBuffer, VK_PIPELINE_STAGE_TOP_OF_PIPE_BIT, VK_PIPELINE_STAGE_TRANSFER_BIT, 0,
                0, nullptr, 0, nullptr, 1, &imageMemoryBarrier);
        }
        VkImageBlit region = {
            { VK_IMAGE_ASPECT_COLOR_BIT, 0, 0, 1 },
            { {}, { int32_t(extent.width), int32_t(extent.height), 1 } },
            { VK_IMAGE_ASPECT_COLOR_BIT, 0, 0, 1 },
            { {}, { int32_t(extent.width), int32_t(extent.height), 1 } }
        };
        imageOperation::CmdBlitImage(commandBuffer, image_conversion, image_blitTo, region,
            { VK_PIPELINE_STAGE_TOP_OF_PIPE_BIT, 0, VK_IMAGE_LAYOUT_UNDEFINED },
            { VK_PIPELINE_STAGE_COLOR_ATTACHMENT_OUTPUT_BIT, VK_ACCESS_COLOR_ATTACHMENT_READ_BIT, VK_IMAGE_LAYOUT_COLOR_ATTACHMENT_OPTIMAL });
    }
}
operator()
填充operator()(const uint8_t* pImageData, VkExtent2D extent, VkFormat format_initial),实现创建预乘alpha贴图的整个流程。
首先当然是创建一个texture2d对象:
texture2d operator()(const uint8_t* pImageData, VkExtent2D extent, VkFormat format_initial) const {
    texture2d texture;

    /*待后续填充*/

    return texture;
}
-
该函数将创建的texture2d对象返回出去,在不开启NRVO(具名返回值优化)时可能会调用移动构造器。
注:如今很多IDE的编译器(比如VS2022 17.4之后的版本)即便在Debug Build下也会默认开启NRVO。
在我先前的代码中,将texture2d的各个成员的访问级别设置为了protected,无法被外部直接修改。
(如果事到如今你还疑惑为什么要有访问级别这种东西来自找麻烦:防止使用你代码的其他人犯蠢)
但是一会儿要写入这几个成员,这里使用一个C++编程技巧来获得访问:
struct texture2d_local :texture2d {
//public:
    using texture::imageView;
    using texture::imageMemory;
    using texture2d::extent;
}*pTexture;
pTexture = static_cast<texture2d_local*>(&texture);
-
在派生类中用
using 基类名::成员名;重设成员的访问级别为前一个访问修饰符指定的级别,若要重设到类或结构体的默认访问级别,可省略访问修饰符。
然后将基类的指针转到派生类的指针,通过派生类的指针来访问需访问的成员(或转引用,通过派生类的引用访问)。 -
Q:为什么不直接创建一个texture2d_local类型的变量并返回出去?
A:返回一个texture2d_local类型的变量与函数的返回类型texture2d不匹配,是不会发生NRVO的(派生类转到基类必然要调用复制/移动构造器,哪怕底层数据不变)。
将图像的大小写入到texture.extent:
pTexture->extent = extent;
创建texture.imageMemory:
uint32_t mipLevelCount = generateMipmap ? texture::CalculateMipLevelCount(extent) : 1;
VkImageCreateInfo imageCreateInfo = {
    .imageType = VK_IMAGE_TYPE_2D,
    .format = format_final,
    .extent = { extent.width, extent.height, 1 },,
    .mipLevels = mipLevelCount,
    .arrayLayers = 1,
    .samples = VK_SAMPLE_COUNT_1_BIT,
    .usage = VK_IMAGE_USAGE_TRANSFER_SRC_BIT | VK_IMAGE_USAGE_TRANSFER_DST_BIT | VK_IMAGE_USAGE_SAMPLED_BIT | VK_IMAGE_USAGE_COLOR_ATTACHMENT_BIT
};
pTexture->imageMemory.Create(imageCreateInfo, VK_MEMORY_PROPERTY_DEVICE_LOCAL_BIT);

//这个handle之后要用5次,先存到变量以简化之后的书写
VkImage image = pTexture->imageMemory.Image();
创建只有一个mip等级的texture.imageView(帧缓冲所用的图像视图必须只有一个mip级别),然后创建帧缓冲:
pTexture->imageView.Create(image, VK_IMAGE_VIEW_TYPE_2D, format_final, { VK_IMAGE_ASPECT_COLOR_BIT, 0, 1, 0, 1 });
VkFramebufferCreateInfo framebufferCreateInfo = {
    .renderPass = renderPass,
    .attachmentCount = 1,
    .pAttachments = pTexture->imageView.Address(),
    .width = extent.width,
    .height = extent.height,
    .layers = 1
};
framebuffer framebuffer(framebufferCreateInfo);
开始录制命令缓冲区,首先调用CmdTransferDataToImage(...),:
auto& commandBuffer = graphicsBase::Plus().CommandBuffer_Transfer();
commandBuffer.Begin();

imageMemory imageMemory_conversion;
CmdTransferDataToImage(commandBuffer, pImageData, extent, format_initial, imageMemory_conversion, image);

/*待后续填充*/

commandBuffer.End();
graphicsBase::Plus().ExecuteCommandBuffer_Graphics(commandBuffer);
在渲染通道中绑定管线,用vkCmdSetViewport(...)动态地指定视口,然后绘制:
void VKAPI_CALL vkCmdSetViewport(...) 的参数说明 |
|
|---|---|
VkCommandBuffer commandBuffer |
命令缓冲区的handle |
uint32_t firstViewport |
首个视口的索引(单视口时为0) |
uint32_t viewportCount |
要指定的视口的个数(单视口时为1) |
const VkViewport* pViewports |
指向VkViewport的数组,用于指定各个视口 |
auto& commandBuffer = graphicsBase::Plus().CommandBuffer_Transfer();
commandBuffer.Begin();

imageMemory imageMemory_conversion;
CmdTransferDataToImage(commandBuffer, pImageData, extent, format_initial, imageMemory_conversion, image);

renderPass.CmdBegin(commandBuffer, framebuffer, { {}, extent });
vkCmdBindPipeline(commandBuffer, VK_PIPELINE_BIND_POINT_GRAPHICS, pipeline);
VkViewport viewport = { 0, 0, float(extent.width), float(extent.height), 0.f, 1.f };
vkCmdSetViewport(commandBuffer, 0, 1, &viewport);
vkCmdDraw(commandBuffer, 4, 1, 0, 0);
renderPass.CmdEnd(commandBuffer);

/*待后续填充*/

commandBuffer.End();
graphicsBase::Plus().ExecuteCommandBuffer_Graphics(commandBuffer);
若callback_copyData不为nullptr,将数据拷贝到暂存缓冲区,留待之后使用。
if (callback_copyData) { VkBufferImageCopy region = { .imageSubresource = { VK_IMAGE_ASPECT_COLOR_BIT, 0, 0, 1 }, .imageExtent = { extent.width, extent.height, 1 } }; vkCmdCopyImageToBuffer(commandBuffer, image, VK_IMAGE_LAYOUT_TRANSFER_SRC_OPTIMAL, stagingBuffer::Buffer_MainThread(), 1, ®ion); }
需要注意的是,先前在CmdTransferDataToImage(...)中将初始的图像数据拷到了暂存缓冲区,然后现在又将混色结果拷到了暂存缓冲区。
由于format_initial和format_final不同,考虑两者每个通道的比特数不同的情况,这两拨数据的大小可能不同,必须在“将初始的图像拷到暂存缓冲区”前确保暂存缓冲区的容量能满足这两个操作,不能等到“录制将混色结果拷到暂存缓冲区的命令”时再扩容缓冲区(扩容极可能要在不同地址上重新分配内存,则先前的数据会丢失)。
如果你没看懂上面在讲啥:
若函数的调用顺序如此:数据拷入暂存缓冲区 → 录制渲染命令 → 扩容暂存缓冲区 → 录制把混色结果拷到暂存缓冲区的命令 → 提交命令
则动作的执行顺序如此:数据拷入暂存缓冲区 → 扩容暂存缓冲区(不保留先前数据) → 提交命令 → 渲染 → 把混色结果拷到暂存缓冲区
因此得在调用CmdTransferDataToImage(...)前就先扩容:
//扩容暂存缓冲区 uint32_t pixelCount = extent.width * extent.height; VkDeviceSize imageDataSize_initial = VkDeviceSize(FormatInfo(format_initial).sizePerPixel) * pixelCount; VkDeviceSize imageDataSize_final = VkDeviceSize(FormatInfo(format_final).sizePerPixel) * pixelCount; if (callback_copyData) stagingBuffer::Expand_MainThread(std::max(imageDataSize_initial, imageDataSize_final)); auto& commandBuffer = graphicsBase::Plus().CommandBuffer_Transfer(); commandBuffer.Begin(); imageMemory imageMemory_conversion; CmdTransferDataToImage(commandBuffer, pImageData, extent, format_initial, imageMemory_conversion, image); renderPass.CmdBegin(commandBuffer, framebuffer, { {}, extent }); vkCmdBindPipeline(commandBuffer, VK_PIPELINE_BIND_POINT_GRAPHICS, pipeline); VkViewport viewport = { 0, 0, float(extent.width), float(extent.height), 0.f, 1.f }; vkCmdSetViewport(commandBuffer, 0, 1, &viewport); vkCmdDraw(commandBuffer, 4, 1, 0, 0); renderPass.CmdEnd(commandBuffer); //拷贝混色结果到暂存缓冲区 if (callback_copyData) { VkBufferImageCopy region = { .imageSubresource = { VK_IMAGE_ASPECT_COLOR_BIT, 0, 0, 1 }, .imageExtent = { extent.width, extent.height, 1 } }; vkCmdCopyImageToBuffer(commandBuffer, image, VK_IMAGE_LAYOUT_TRANSFER_SRC_OPTIMAL, stagingBuffer::Buffer_MainThread(), 1, ®ion); } /*待后续填充*/ commandBuffer.End(); graphicsBase::Plus().ExecuteCommandBuffer_Graphics(commandBuffer);
如有必要就生成mipmap,若不生成mipmap但先前有将混色结果拷贝到暂存缓冲区,将内存布局转到VK_IMAGE_LAYOUT_SHADER_READ_ONLY_OPTIMAL:
//扩容暂存缓冲区 uint32_t pixelCount = extent.width * extent.height; VkDeviceSize imageDataSize_initial = VkDeviceSize(FormatInfo(format_initial).sizePerPixel) * pixelCount; VkDeviceSize imageDataSize_final = VkDeviceSize(FormatInfo(format_final).sizePerPixel) * pixelCount; if (callback_copyData) stagingBuffer::Expand_MainThread(std::max(imageDataSize_initial, imageDataSize_final)); auto& commandBuffer = graphicsBase::Plus().CommandBuffer_Transfer(); commandBuffer.Begin(); imageMemory imageMemory_conversion; CmdTransferDataToImage(commandBuffer, pImageData, extent, format_initial, imageMemory_conversion, image); renderPass.CmdBegin(commandBuffer, framebuffer, { {}, extent }); vkCmdBindPipeline(commandBuffer, VK_PIPELINE_BIND_POINT_GRAPHICS, pipeline); VkViewport viewport = { 0, 0, float(extent.width), float(extent.height), 0.f, 1.f }; vkCmdSetViewport(commandBuffer, 0, 1, &viewport); vkCmdDraw(commandBuffer, 4, 1, 0, 0); renderPass.CmdEnd(commandBuffer); //拷贝混色结果到暂存缓冲区 if (callback_copyData) { VkBufferImageCopy region = { .imageSubresource = { VK_IMAGE_ASPECT_COLOR_BIT, 0, 0, 1 }, .imageExtent = { extent.width, extent.height, 1 } }; vkCmdCopyImageToBuffer(commandBuffer, image, VK_IMAGE_LAYOUT_TRANSFER_SRC_OPTIMAL, stagingBuffer::Buffer_MainThread(), 1, ®ion); } //生成mipmap,转换内存布局 if (mipLevelCount > 1 || callback_copyData) imageOperation::CmdGenerateMipmap2d(commandBuffer, image, extent, mipLevelCount, 1, { VK_PIPELINE_STAGE_FRAGMENT_SHADER_BIT, VK_ACCESS_SHADER_READ_BIT, VK_IMAGE_LAYOUT_SHADER_READ_ONLY_OPTIMAL }); commandBuffer.End(); graphicsBase::Plus().ExecuteCommandBuffer_Graphics(commandBuffer);
命令执行完后还剩两件事:
1.执行回调函数
2.若生成了mipmap,析构原本只有1个mip级别的图像视图,创建有多个mip级别的图像视图
//执行回调函数
if (callback_copyData)
    callback_copyData(stagingBuffer::UnmapMemory_MainThread(imageDataSize_final), imageDataSize_final),
    stagingBuffer::UnmapMemory_MainThread();
//创建image view
if (mipLevelCount > 1)
    pTexture->imageView.~imageView(),
    pTexture->imageView.Create(image, VK_IMAGE_VIEW_TYPE_2D, format_final, { VK_IMAGE_ASPECT_COLOR_BIT, 0, mipLevelCount, 0, 1 });
对代码进行整理,最后整个函数如下:
texture2d operator()(const uint8_t* pImageData, VkExtent2D extent, VkFormat format_initial) const { texture2d texture; imageMemory imageMemory_conversion; //扩容暂存缓冲区 uint32_t pixelCount = extent.width * extent.height; VkDeviceSize imageDataSize_initial = VkDeviceSize(FormatInfo(format_initial).sizePerPixel) * pixelCount; VkDeviceSize imageDataSize_final = VkDeviceSize(FormatInfo(format_final).sizePerPixel) * pixelCount; if (callback_copyData) stagingBuffer::Expand_MainThread(std::max(imageDataSize_initial, imageDataSize_final)); //获取对受保护成员的访问 struct texture2d_local :texture2d { using texture::imageView; using texture::imageMemory; using texture2d::extent; }*pTexture; pTexture = static_cast<texture2d_local*>(&texture); pTexture->extent = extent; //创建imameMemory uint32_t mipLevelCount = generateMipmap ? texture::CalculateMipLevelCount(extent) : 1; VkImageCreateInfo imageCreateInfo = { .imageType = VK_IMAGE_TYPE_2D, .format = format_final, .extent = { extent.width, extent.height, 1 },, .mipLevels = mipLevelCount, .arrayLayers = 1, .samples = VK_SAMPLE_COUNT_1_BIT, .usage = VK_IMAGE_USAGE_TRANSFER_SRC_BIT | VK_IMAGE_USAGE_TRANSFER_DST_BIT | VK_IMAGE_USAGE_SAMPLED_BIT | VK_IMAGE_USAGE_COLOR_ATTACHMENT_BIT }; pTexture->imageMemory.Create(imageCreateInfo, VK_MEMORY_PROPERTY_DEVICE_LOCAL_BIT); VkImage image = pTexture->imageMemory.Image(); //创建帧缓冲 pTexture->imageView.Create(image, VK_IMAGE_VIEW_TYPE_2D, format_final, { VK_IMAGE_ASPECT_COLOR_BIT, 0, 1, 0, 1 }); VkFramebufferCreateInfo framebufferCreateInfo = { .renderPass = renderPass, .attachmentCount = 1, .pAttachments = pTexture->imageView.Address(), .width = extent.width, .height = extent.height, .layers = 1 }; framebuffer framebuffer(framebufferCreateInfo); //录制命令 auto& commandBuffer = graphicsBase::Plus().CommandBuffer_Transfer(); commandBuffer.Begin(); //把图像数据搬到图像附件 CmdTransferDataToImage(commandBuffer, pImageData, extent, format_initial, imageMemory_conversion, image); //渲染,使用图像附件中已有的色值做混色 renderPass.CmdBegin(commandBuffer, framebuffer, { {}, extent }); vkCmdBindPipeline(commandBuffer, VK_PIPELINE_BIND_POINT_GRAPHICS, pipeline); VkViewport viewport = { 0, 0, float(extent.width), float(extent.height), 0.f, 1.f }; vkCmdSetViewport(commandBuffer, 0, 1, &viewport); vkCmdDraw(commandBuffer, 4, 1, 0, 0); renderPass.CmdEnd(commandBuffer); //如有必要,拷贝混色结果到暂存缓冲区 if (callback_copyData) { VkBufferImageCopy region = { .imageSubresource = { VK_IMAGE_ASPECT_COLOR_BIT, 0, 0, 1 }, .imageExtent = { extent.width, extent.height, 1 } }; vkCmdCopyImageToBuffer(commandBuffer, image, VK_IMAGE_LAYOUT_TRANSFER_SRC_OPTIMAL, stagingBuffer::Buffer_MainThread(), 1, ®ion); } //如有必要,生成mipmap,转换内存布局 if (mipLevelCount > 1 || callback_copyData) imageOperation::CmdGenerateMipmap2d(commandBuffer, image, extent, mipLevelCount, 1, { VK_PIPELINE_STAGE_FRAGMENT_SHADER_BIT, VK_ACCESS_SHADER_READ_BIT, VK_IMAGE_LAYOUT_SHADER_READ_ONLY_OPTIMAL }); //结束录制,执行命令 commandBuffer.End(); graphicsBase::Plus().ExecuteCommandBuffer_Graphics(commandBuffer); //执行回调函数 if (callback_copyData) callback_copyData(stagingBuffer::UnmapMemory_MainThread(imageDataSize_final), imageDataSize_final), stagingBuffer::UnmapMemory_MainThread(); //创建image view if (mipLevelCount > 1) pTexture->imageView.~imageView(), pTexture->imageView.Create(image, VK_IMAGE_VIEW_TYPE_2D, format_final, { VK_IMAGE_ASPECT_COLOR_BIT, 0, mipLevelCount, 0, 1 }); return texture; }
至此为止的示例代码请参见:EasyVulkan.hpp
使用这个类的方法很简单,像这样:
static VkExtent2D imageExtent;
auto pImageData = texture::LoadFile("texture/testImage.png", imageExtent, FormatInfo(VK_FORMAT_R8G8B8A8_UNORM));
easyVulkan::fCreateTexture2d_multiplyAlpha function(VK_FORMAT_R8G8B8A8_UNORM, true,
    [](const void* pData, VkDeviceSize) {
        stbi_write_tga("texture/testImage_pa.tga", imageExtent.width, imageExtent.height, 4, pData);
    }
);
texture2d texture_premultipliedAlpha = function(pImageData.get(), imageExtent, VK_FORMAT_R8G8B8A8_UNORM);
-
使用stb_image_write.h中的函数stbi_write_tga(...)将图像数据保存为TGA格式,TGA格式使用RLE算法进行压缩,这是一种非常简单的压缩算法,还原后透明像素的数据不变。
之后就是使用预乘alpha的贴图进行渲染来看看效果了,你拿Ch7-6里的代码改改就行。
我在Ch8-4.hpp中提供了比对使用直接alpha/预乘alpha贴图渲染效果的简单示例。